Starting Docker Journey — Part 2
In the previous part, I covered the need for Docker, Docker Architecture, its comparison, and the benefits of Docker over VM architecture.
Now in this part, I will cover some basic Docker usages.
Let’s start with installing Docker.
6. Docker Setup and Installation
- Download and install Docker from the official Docker Website.
- It will install both Docker Daemon as well as Docker Client
- Once done, you can run
docker versioncommand to verify docker versions and details

- To verify everything is working fine, just run an image
docker run hello-worldcommand in your terminal. After running the command, you should see some output like this

7. Docker Commands
- To list all the docker commands, just enter
docker help, and you will get the list of all docker commands, options, etc. - Run
docker <command> --helpto get more detailed information on any docker command.
We will now look into some Docker commonly needed Docker commands:
7.1 To list down all the images present
docker images command lists all the images present in the machine

7.2 To list all the Containers present
docker ps -a command lists all the containers(running, exited, etc.) present in the machine

In this above image, a hello-world container was created and now exited 3 seconds ago.
7.3 To list all the running containers
docker ps command lists all the running containers

7.4 To pull any container from Docker Hub
docker pull <imageName> pulls docker images from the docker registry.
You can run docker images after that to check if the image is present or not
7.5 To run any image
- To run any image, or in other words, to spin out a container out of the image, just use
docker run <image name> - In case the container does not have any long running process, then the container will exit immediately after the process gets executed.
- But on the other hand, in case the container has any long-running process, the container will occupy your terminal until that process will be completed, or you forcefully stopped the container. This is called attached mode. By default, Docker runs all the containers in attached mode.
7.6 To run any image in detached mode
- To overcome the issue of the container occupying your terminal, you can run your container in a detached mode(background mode).
- By running your container in detached mode, you will just get the container id and it will not occupy your terminal

- To attach back to the console/terminal, just provide attach command with the container id

7.7 To stop any container
- To stop any running container, either provide the Container id or the Container name
- With container id :
docker stop <containerId> - With container name:
docker stop <containerName>
7.8 Removing any non-running Container
- You can remove any non-running container permanently by providing the Container id or the Container name
- With container id :
docker rm <containerId> - With container name:
docker rm <containerName> - Once you execute this command, you should get the containerId or containerName printed back on your terminal

7.9 Removing any unused images
- run
docker rmicommand to remove any non-used image. - To remove an image, you should first delete all dependent containers to remove the image

7.10 Execute command on a non-running container
- To execute any command on the non-running container just append the command after the image name

- run
docker ps -acommand to see the last command got executed on ubuntu image

7.11 Execute a command on a running container
- To execute any command on the running container, use
execcommand with thecontainer nameor withcontainer id - First list the running container to get the container name

- Now execute command
docker exec <container name> <command>
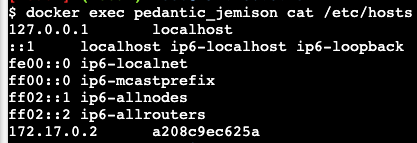
- In the above image,
pedantic_jemisonis the container name andcat /etc/hostsis the command which I executed. After that, I can see all the hosts entries present in the container listed back on the terminal
7.12 Two ways of executing the bash command
docker run -it <imageName> bash=> this will execute bash command during starting the container itselfdocker exec -it <conainerName> bash==> this will execute bash command in the already running container
8. Docker run commands
There are some advanced parameters that can be appended to docker run command
8.1 Tag :
- Whenever we do
docker run <imageName>, by default docker checks for the image with a tag:latest - Tagging in docker is the same as versioning in GIT.
- If you don’t specify, any specific version(tag) of the docker image you want to pull or run, docker by default considers the image with the latest tag.
- For eg.. let’s run a docker image
hello-worldwithout specifying any tag.

Since I didn’t specify any tag, hence docker by default considers the latest tag.
- To run any specific version/tag of the docker image, you just need to append tagName after the image name, separated by a colon
- Eg:
docker run <imageName:tagVersion>

8.2 STDIN:
- By default, Docker container does not listen to any standard input.
- Even though you are attached to its console, it will not be able to read any input from you, as it does not have any terminal to read inputs from. By default, it runs in a non-interactive mode.
- If you want to provide input to the container, then you must map the standard input of your host to the docker container using
-iparameter. - Also to attach the terminal to a container, you must use
-tparameter. - So by using
docker run -it ubuntuwe are running ubuntu image in an interactive mode.

In the above screenshot, firstly I run the ubuntu image in an interactive terminal mode. After that, I just ran a command to show the contents of the release file present in ubuntu.
9. Port Mapping
- In docker, all the applications inside the container run on some specific ports. If you want to access any particular application with the help of a port number, you need to map the port number of the container with the port number of the docker host
- The underlying host where docker is installed is called Docker Host.
- When you run a containerized web application, then you can see the server is running, but to access the application from the outside world, you need a mapping between the internal port of the docker and the outer port of the host
- The pattern of port forwarding/port-mapping is
-p HOST:CONTAINER, means-pcommand is followed by HOST port first, and then the port number of the container.

Few Examples:
docker run -p 80:4444 selenium/standalone-chromedocker run -p 3306:3306 mysqldocker run -p 8000:5000 simple-webapp
10. Volume Mapping
Now let’s see how data is persisted in a docker container. For eg: you need to run a mysql container. After data is created, files are stored at /var/lib/mysql inside the docker container.
Remember, docker container has its own isolated file system and any change that happens to file within docker remain within the container.
Now, let’s suppose you want to delete the mysql container, but as soon as you will delete the mysql container, all the data inside the container will be lost.
If you would like to persist the data, you need to map a directory outside of docker host to a directory inside the container.
In the same way as Port mapping, we will map the external directory to the internal directory
docker run -v <externalDirPath>:<internalDirPath> <containerName>
eg: I have a directory my-sql-data present outside my docker host. And I want to map my /var/lib/mysql directory present inside mysql container to it.
docker run -v /my-sql-data:/var/lib/mysql mysql
11. Inspect Container
To see detailed information of a docker container, use docker inspect with docker container name or docker id to get all the information of a docker container.
Docker inspect returns the result in the JSON format.
Command to use docker inspect
docker inspect <containerId> or docker inspect <containerName>

12. Container Logs
If you want to see logs of any container which you ran in a detached mode, you can use docker logs <containerName> or docker logs <containerId>
There is much more to docker, and in the next part, I will cover Docker compose, Docker images, Docker Networking, and so on…
I hope you enjoyed reading this article, as much as I enjoyed writing it. If you like this article please let me know! But, more importantly, if you disagree with this article please, please, please let me know! I made this with the hope of helping the community, as more we share, more we learn and the cycle continues. If you have a suggestion or critique please feel free to drop in any comments.